How to Make Cyanotype Journal Pages: Your Sun-Print Guide
By Coralie · June 22, 2026 · 12 min read
You lay a fern on coated paper, set it in the sun, and walk away. Ten minutes later, you lift the fern and there's a perfect ghost of it pressed into brilliant blue. That's cyanotype. It's been around since 1842, it costs about fifteen dollars to try, and it makes the most striking journal pages I've ever seen.
What cyanotype actually is
You are not painting.
You are not drawing.
You are printing with light, and summer is your darkroom.
Coralie, CoraCreaCrafts
Cyanotype is a photographic printing process that uses UV light to reduce iron salts and form Prussian blue pigment wherever light hits the paper. You coat paper with two chemicals, arrange objects on top, expose it to sunlight, then rinse it in cold water. The coated areas under your objects stay white. Everything exposed to sun turns blue.
In 1843, a botanist named Anna Atkins made the first book in history illustrated with photographs. Not drawings, photographs, of algae she laid in the sun. Her medium was this exact blue chemistry. The same process sits in a twelve-dollar kit at your craft store right now.
Anna Atkins, Photographs of British Algae: Cyanotype Impressions, 1843, the world’s first photographically illustrated book. The same iron-salt chemistry, the same UV light, the same Prussian blue. Public domain.
UV index peaks in June in most of North America, which means shorter exposure times, sharper edges, and deeper blues. You need UV index 5 or higher for reliable printing. That's the window. At UV index 9 or 10, which Nashville and most of the US hits daily in June, a well-coated sheet exposes in two to four minutes in direct sun.
The plants are also at peak right now. Ferns are lush and fully open. Queen Anne's Lace is starting. Lavender is ready. There's a real clock on this. By late August, the UV drops, the plants start to go to seed, and the window for the most effortless prints closes until next year.
☀
Peak UV window: June 10 to July 15 gives you the shortest exposure times and richest blues of the year. The plants are at their peak right now, too.
Peak UV means prints like this in under three minutes. That resolution only happens when the sun is doing real work.
Plants and objects that print beautifully
The best subjects are flat. Flat things give sharp, clean silhouettes. Thick things give softer, more diffused edges, which can be gorgeous in a different way. Here's what to gather this week:
Everything fits on one corner of a kitchen table. The kit is the only thing to order — the rest lives at any craft store, a dollar store, or already at home.
Disclosure: some links below are affiliate links — CoraCreaCrafts earns a small commission at no extra cost to you.
★ Start here
Jacquard Cyanotype Sensitizer Set
The two-part iron-salt formula that turns plain watercolor paper into sun-reactive cyanotype paper. One set makes roughly 40-60 journal-sized prints. Part A + Part B, mixed in equal parts — this is the kit the steps below are written for.
Cold press works best. Thinner paper buckles when wet; 140 gsm holds the blue perfectly.
✦
Foam brush, 1-2 inch
Dollar-store quality is perfectly fine. Use one and rinse it immediately after coating.
✦
Nitrile gloves
Wear these for the coating step. The sensitizer stains skin yellow-brown; gloves prevent that.
✦
Glass or acrylic pane (optional)
Lays on top during exposure. A thrift-store picture frame works. Sharpens edges dramatically.
✦
Shallow plastic tray
For the cold-water rinse after exposure. Any plastic bin or baking dish works.
✦
Flat plants or objects
Free. Ferns, lace, pressed leaves, feathers — anything thin. Gather just before you print for the sharpest edges.
How to make a cyanotype print, step by step
The whole process takes about thirty minutes of active time, plus fifteen minutes in the sun. Here's exactly what to do:
1
Mix and coat your paper
Combine equal parts Part A and Part B from your kit under low indoor light. Brush an even coat onto watercolor paper and let it dry completely in a dark room. If you're coating your own paper, keep it out of any UV light until you're ready to print. A hair dryer on low speeds up drying.
2
Arrange your objects in shade
Do this step indoors or in deep shade. Lay your ferns, leaves, lace, or whatever you chose onto the coated paper. Work quickly. Once you carry it into the sun, there's no rearranging. A pane of glass laid on top keeps everything flat and gives the sharpest edges.
3
Expose in direct sun
Carry your setup into direct sunlight. Set a timer based on your conditions (see the sun timer below). The paper will shift from yellow-green to gray as it exposes. That gray tells you it's working. Pull it before it gets too dark or the shadows fill in.
4
Rinse in cold water
Remove your objects and carry the paper inside. Hold it under cool running water for two to three minutes. You'll watch it go from that grayish exposed state to brilliant Prussian blue. This is the most satisfying part. Keep rinsing until the water runs completely clear.
5
Dry flat and watch it deepen
Lay the print face-up on a dry towel or hang it on a line. The blue deepens further as it oxidizes over the next few hours. Wait until it's bone dry before handling it or gluing it into your journal. Rushing this step causes the paper to crinkle. An hour is usually enough in summer heat.
6
Mount it in your journal
Once it's dry, glue the print directly onto journal pages, or cut it into shapes to layer with washi, stamps, and pressed flowers. A glue stick works for small pieces. Mod Podge Matte on the edges keeps larger prints flat. The Artemis Rice Paper pages make a gorgeous background layer underneath.
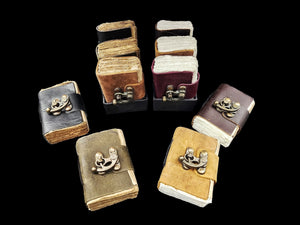
What you’re making: finished cyanotype prints ready to mount in your journal
Exposure time is the variable that trips beginners most often. It changes with your UV index, the time of day, and your specific paper. Use this as your starting guide, then adjust one session at a time.
High UV
Summer sun does the work
Peak UV index in June means shorter exposure times and richer blues than any other season. A bright midday in June is the best light you'll have all year.
☀ Exposure time by light condition
Bright midday sun (UV 8-10) 2 min
Partial cloud cover 4-5 min
Morning or evening sun 8-10 min
Overcast (still works!) 12-15 min
UV nail lamp (indoor) 6-8 min
Ways to use cyanotype prints in your journal
Once it's dry, a cyanotype print is just paper. You can do anything you'd do with any other paper: glue it, cut it, layer over it, stamp on top of it, or tear it and use it as a base for a junk journal-style collage. Here are the spread ideas that keep coming up in the community:
The blueprint grid spread is a favorite: use graph-paper-style washi tape over a cyanotype fern print and add written notes in white ink. The blue-and-white color story feels clean and intentional. The nature journal spread goes the other direction: mount the cyanotype on the left, the actual pressed plant on the right, and write the botanical name and where you found it. By September, you have a record of an entire summer's worth of plants.
No one else on earth can make your print. The fern you picked grew in your yard, the sun that exposed it stood at the exact angle it did this one afternoon, and the way you laid the frond down will never happen the same way twice. A printer makes a thousand identical copies. This makes one. That is rare in a world where most of what we look at was built to be duplicated.
For a journaler, that is the whole point. Your pages stop looking like everyone else's washi haul and start looking like you, like the specific Tuesday afternoon you spent out in the grass. When something is genuinely one of a kind, people lean in. That is why these prints travel so well online, and why yours will too.
The first time you lift the glass and see that blue, you are going to want someone else to see it too. That is half the fun, so go ahead: text the photo to the friend who would get it, or post the spread before the print is even dry. A sun print practically asks to be shared.
If you try this, steal these captions:
Day made. Laid a fern on paper, left it in the sun for two minutes, rinsed it, and got THIS. No printer, no drawing skills, just July sunlight. The blue is even better in person. Officially obsessed. 💙 #cyanotype #sunprint #naturejournal #journaltok
Spent the morning printing shadows. This is a cyanotype, the oldest photo process there is, and all it takes is sunlight and a fern from the backyard. It's going straight into my summer journal next to the pressed version. Tell me you'd try this. 🌿💙 #cyanotype #cottagecore #pressedflowers #journalspread
You can turn a weed from your yard into deep blue art for about fifteen dollars. I made four of these before lunch. If you've been meaning to try sun printing, this is your sign, the summer light is peaking right now. Save this for the weekend. ☀️💙 #sunprintseason #cyanotypeart #slowliving #mixedmedia
The blueprint grid: your summer cyanotype checklist
Here's everything you need to gather before your first print session. Check things off as you collect them.
Don't treat it as a one-time project. Cyanotype pairs naturally with the seasons: ferns in June, grasses in July, seed heads in August, skeleton leaves in autumn. One print session per week means forty or so prints by the end of summer. That's enough for a dedicated cyanotype journal, a gift, or a zine.
By September, you have a record of an entire summer's worth of plants from one garden, one park, one place you love. That's the thing about botanical journaling that keeps pulling people back: the journal becomes a calendar of where you were and what was growing.
I haven't been this excited about a craft in years. I did my first fern print on Saturday and I've already ordered more paper.
Community member, Vintage Craft Box
The cyanotype chemicals are widely available. What's harder to source on short notice is the surrounding craft layer: papers that work under and alongside prints, washi that complements the blue, ephemera that belongs in a botanical journal. That's what the boxes are for.
Ships within 48 hours. The June Vintage Craft Box and the Digital Journal Club are both in stock now. The Curiosities Box typically sells out mid-month.
Start your cyanotype journal this week
The Vintage Craft Box ships monthly with botanical-themed papers, washi, and ephemera chosen to work together. The Digital Journal Club adds printable backgrounds and botanical illustrations you can layer behind your prints the same day.
Both work. Pre-mixed kits like Jacquard Cyanotype Set ($12-18) are the easiest starting point: you get two solutions, mix them together, and you're ready to coat paper. Buying ferric ammonium citrate and potassium ferricyanide separately is cheaper per sheet if you plan to make a lot of prints, but the kit is worth it for your first batch. Whichever route you take, the coating and exposure process is exactly the same.
You need UV light. Sunlight is the best and most accessible source. A bright summer day does the job in two to fifteen minutes depending on cloud cover. Regular household bulbs and most LED room lighting won't work because they put out almost no UV. UV nail lamps (the kind used for gel polish) work well as an indoor alternative: 5-8 minutes under a UV lamp gives a reliable print. Set your paper in a shaded spot while you arrange your objects so stray light doesn't fog the rest of the sheet.
They're quite stable once fully developed and dried. The Prussian blue that forms during washing is lightfast and holds well for decades in normal indoor conditions. The main risk is prolonged direct sunlight. A journal left open on a sunny windowsill will fade over weeks. Keep the journal closed when you aren't looking at it, and store it away from direct sun. Some journalers seal finished pages with a light matte varnish for extra protection, though it isn't required.
Watercolor paper is the classic choice: 140 gsm cold press absorbs the chemicals well and handles the water rinse without buckling. Cotton rag papers give especially rich blues. Thick mixed-media paper (90-140 gsm) also works and is easier to find at craft stores. Standard printer paper is too thin and will buckle badly during rinsing. Pre-sensitized cyanotype paper is a great option if you want to skip the coating step entirely. It's ready to use straight from the pack.
Watch the color. Before exposure, your coated paper is a yellow-green. As it sits in the sun, it gradually darkens to a gray-green, then a darker bronze-gray. When it looks distinctly gray, it's done. If you pull it too early the shadows stay pale; if you leave it too long the highlights start to fill in. The rinse will shock you. A fully exposed print that looks almost wrong (very dark) turns brilliant blue the moment it hits water. Trust the process.
A pale, washed-out print didn't get enough UV. The most common causes are: too much cloud cover, printing too early or late in the day when UV is low, or pulling the paper too soon. Try again on a brighter day between 10am and 2pm, or double your exposure time. A second common issue is coating too thin. Apply enough sensitizer to get an even, slightly visible layer, not just a damp shine. If the print came out evenly pale with no contrast at all, the sensitizer may have been applied under too much light before exposure.
Anything flat and interesting. Flat plants work best: ferns, pressed leaves, grasses, Queen Anne's Lace, chamomile, and lavender sprigs all give sharp silhouettes. Thicker objects like whole flowers create softer edges, which can be beautiful in a different way. Beyond plants, try lace fabric, skeleton leaves, feathers, sequins, cut paper shapes, and your own hand. The rule is simple: if it lies flat on the paper and blocks light, it prints. The Wilderkind trend this season has brought dried thistle and black-eyed Susan centers into a lot of prints.
Cyanotype is one of the gentler photographic processes, and millions of people make it safely at home, but the sensitizer is still a mild irritant, so treat it with everyday care. Wear gloves when you mix or coat, work in a ventilated spot, keep it off your skin and food surfaces, and wash your hands afterward. Despite the alarming name, potassium ferricyanide is not cyanide and does not release cyanide gas in normal use. The one rule that matters: never mix it with strong acids or bleach, since that is the only situation that can create harmful fumes, so keep them well apart in storage. Small amounts of rinse water are generally fine down the drain with plenty of running water, but check your local regulations, since they vary by area. Always follow the specific safety instructions printed with your kit, since formulas differ between brands. For formal safety or liability questions, refer to that product's own Safety Data Sheet (SDS). And if you would rather skip the chemistry altogether, pre-coated paper lets you print with nothing but sunlight and water.
It's a wonderful kids' project. The sun exposure step is genuinely exciting for children. They can arrange their own objects and then watch the print reveal during rinsing. Use pre-coated cyanotype paper to remove the chemical handling step. If you're coating your own paper, adults handle that part and kids take over for the arranging, exposure, and rinsing. The rinse is the magic moment: a dark, weird-looking sheet turns Prussian blue in cold water. Kids absolutely love it.
June is the best month of the year for this. Ferns are at peak fullness and give the sharpest silhouettes. Queen Anne's Lace is starting to open. Press the lacy heads before they go to seed for the finest detail. Chamomile, cosmos, and lavender are all ready. Grasses and clover are everywhere and free. Fresh mint, yarrow, and ginkgo leaves all print beautifully. Check your garden, a park path, or a roadside ditch before buying anything. The more variety in size and texture, the more interesting your journal pages will be.
They're made for each other. Cyanotype gives you the blue graphic silhouettes; pressed flowers add real texture, color, and depth on the opposite page or even layered on top of a developed print. A spread with a cyanotype fern print on the left and the actual dried fern mounted on the right is one of the most striking journal layouts you can make. Use the same plant, same day, for both. The juxtaposition is the whole point.
The Vintage Craft Box is the best starting point. It ships monthly with coordinated supplies, and the botanical-leaning themes include papers, washi, and ephemera that pair directly with cyanotype prints. If you'd rather have the whole kit chosen for you (cyanotype paper included), watch for our summer boxes, which often include sun-printing supplies. The Digital Journal Club is a low-cost add-on for printable botanical ephemera and backgrounds you can layer behind your prints the same day you order.
Mostly yes, with one thing to check. 'Sun print' is just the friendly name for cyanotype, so the two terms get used interchangeably on packaging. The difference is the chemistry inside: a true cyanotype kit gives you the two iron-salt bottles, or paper already coated with them, that rinse to that deep Prussian blue, while a few craft-store 'sun print' papers use a cheaper light-sensitive dye that fades faster and never reaches the same saturation. If the box mentions ferric ammonium citrate and potassium ferricyanide, or names cyanotype anywhere, you are getting the real archival process. For journal pages you want to keep, reach for the cyanotype version every time.
The honest answer is that a well-rinsed cyanotype barely needs sealing, but a little care goes a long way in a journal that gets handled. Once the print is bone dry, mount it with photo corners or a thin line of archival glue rather than tape that yellows, and slip a sheet of glassine over any print you keep on display. Skip lamination and spray fixatives, since the heat and solvents can shift the blue. Store the journal closed and out of direct sun, and keep it away from anything alkaline, because high-pH papers and buffered boards are the one thing that quietly drains the color. Treated this way, a print you make this July will still be vivid years from now.
You can, and it is a fun rabbit hole, though it is a slightly different craft from journaling. The same sensitizer coats cotton, linen, and raw wood beautifully, which is how people make those sun-printed tote bags and tea towels, but those surfaces need longer exposures and a more thorough wash to clear the chemistry. For journal pages I stay on paper, since it lies flat, tips cleanly into a spread, and takes handwriting and washi on top without a fight. If you fall in love with the process and want to branch out, start with a scrap of pre-washed cotton and treat it as its own project rather than a page. Paper first, fabric later, is the order I would give anyone.
We use cookies to analyze traffic and personalize your experience.
Privacy Policy


 ►
►


 ►
►

 ►
►
 ►
►
 ►
►


 ►
►
 Digital Club
$5.00
Digital Club
$5.00
 Sticker Club
$24.00
Sticker Club
$24.00
 Vintage Box
$50.00
Vintage Box
$50.00
 Curiosities Box
$95.00
Curiosities Box
$95.00
 Treasure Box
$140.00
Treasure Box
$140.00